Commercial Threshold Seal 25mm High - Installation Instructions
For the best results the surface should be smooth, flat, and devoid of any bumps or troughs. Remedial action should be undertaken to rectify uneven surfaces prior to fitting the seal.
Always unpack your box and check the contents before commencing installation.
For rough surfaces GaraDry adhesive & sealant should be used underneath the threshold seal to ensure a watertight seal.
Preparing the installation area
Thoroughly sweep the installation area to remove any dust and debris prior to fitting.

Choose the installation position
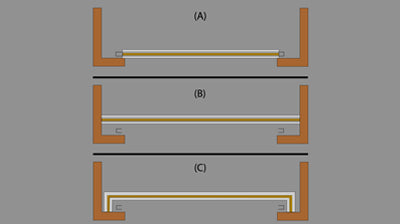
CHOOSE AN INSTALLATION POSITION
POSITION A
The threshold is installed between the door tracks.
POSITION B
The threshold is installed wall-to-wall behind the garage door tracks.
POSITION C
The threshold seal is installed slightly back from the door and mitred around the door tracks. This may be suitable if the door has an alarm sensor that cannot be removed.
Measure the installation area
Based on the position you selected in Step 2:
a) Measure the width of the opening in between the door tracks
b) Measure the distance wall-to-wall
c) Measure around the door tracks, and the distance between the threshold seal fitting position and the wall

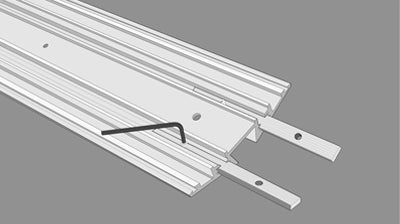
Insert the joining bars
For threshold seals longer than 2.5m, the kit contains multiple aluminium sections which must be joined together.
Insert the joining bars into the end of one length of the threshold and lock firmly in place with grub screws (use the included allen key to tighten the grub screw).
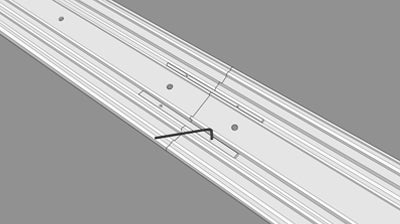
Join together aluminium sections
Slide another section of aluminium threshold over the joining bar making sure that there is no gap between the lengths.
Tighten in place with a grub screw.
Repeat for all remaining lengths, BUT leave the last length unattached at this stage.
Cut the threshold seal to size
Based on the position you selected in Step 2:
a) Mark and cut the threshold to size to sit in between the door tracks (notch the seal around the tracks as shown)
b) Mark and cut the threshold to size to fit from wall-to-wall
c) Measure the distance between the wall and the back edge of the threshold seal and cut the end sections to this length. Using a mitre saw, cut the threshold seal sections accordingly (TOP TIP: Using cardboard templates to ensure your measurements and cutting is correct)
Check the fitting
Attach the final length and lay the entire threshold across the installation area to ensure a good fit.
Insert the bottom seals
Slide the continuous bottom seals into the underside of the threshold on either side, and then cut off any excess.

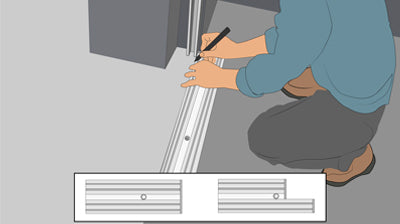
Mark the drill holes
Return the threshold seal to an upright orientation and lay it into position.
Using a marker pen/pencil, mark where to drill the holes in the concrete.

Drill pilot holes in the concrete
Remove the threshold, and using a 6mm drill bit, drill the holes for the screws.
Once completed, ensure the surface is brushed clean to remove debris.

Apply the adhesive (optional)
In the case of the floor being uneven, lay a bed of adhesive underneath where the threshold seal is to be fitted to ensure a watertight seal.
With the threshold seal in position, mark along the front and back edge of the seal with a marker pen/pencil.
Remove the threshold seal and mark a line approx 10mm inside the existing lines, followed by a zig zag line in the middle of them.
Apply adhesive & sealant following the pencil lines created.

Lay the threshold
Place the threshold seal back into position.
Insert all the screws in their respective holes and hand tighten each of them, or use an electric screwdriver but do not tighten them fully.
Ensure that all screws fit snugly.
NOTE: There is no need to use plugs as the fixings have a cut thread design that enables them to be drilled into concrete.

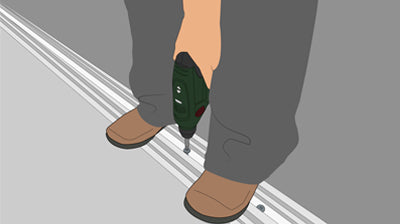
Screw in place
Apply pressure to the threshold seal with your foot.
Using an electric screwdriver and T30 screwdriver bit (included in the kit), tighten the screws into place making sure they are flush but do not overtighten.
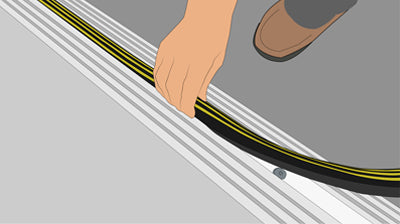
insert the top seal
Wipe the the channel and surface of the threshold seal to remove any grease or dirt.
Starting from one end of the threshold, pinch the legs of the PVC black and yellow insert and push it in to the top of the threshold until it 'snaps into place'. Continue this process with the remainder of the threshold, taking care to ensure that it is firmly pushed down.
Seal the edges
Depending on the fitting position of the threshold seal:
a) Apply sealant & adhesive around the edges of the threshold seal and the frame to ensure a watertight seal.
b) Apply sealant & adhesive around the edges of the threshold seal and the wall to ensure a watertight seal.
c) Apply adhesive and sealant in the mitre join of the threshold seal, and around the edges of the seal to ensure a watertight seal.

Test the threshold (optional)
Using a bucket of water, or a hosepipe, test the threshold seal for water ingress.
If water enters underneath the threshold seal run a line of adhesive & sealant along the front and back edge of the seal.
Alternatively, unscrew the threshold seal and apply a bed of adhesive as per Step 11 of the instructions.